Sophie will be inheriting the queen size bed from our guest room which we are converting into a nursery. Do you know how hard it is to find a PINK queen-size bedskirt? There are tons to choose from for twin and full size beds but I guess most little girls don't have a queen size. Luckily I found a solution.
When I saw the ruffles on this duvet cover peaking out at me from the linens section in the thrift store, I could not resist. When I got it home and realized that it was the exact same pink in Sophie's "big girl" bedding, it was too good to be true. So I decided to transform this duvet into a bedskirt.
I was hoping I could get away with simply cutting / stitching the corners and not having to construct the bedskirt from scratch but no such luck. It was about 1" too short on each side and 2" short in the front, and the corners hung down several inches below the sides and front. That wasn't going to work. So out came the scissors and the sewing machine.
The duvet was double sided as it had a pocket to insert a comforter, so I had to pull out the seam ripper and remove one side of the fabric. (And now I have lots of extra pink fabric for making who knows what!) I know it's unlikely that most people will be converting duvet covers into bedskirts, but the steps below could also be applied if you are using a regular sheet.
I wanted a 14" drop on the skirt, which is pretty standard for most beds. So I cut up 16" up from the bottom of the ruffle around both sides and the front to allow for serging and a large 1" to 1.5" seam allowance. I wanted to have extra that could be let out in the event that the drop was too short. Better safe than sorry!
This is what the duvet cover looked like at this point:
In order to eliminate the fact that the corners were too long, and also to be able to add inverted box pleats at both corners, I cut the duvet cover at both front corners, as shown below.
After serging both cut edges to prevent fraying, I pinned right sides together and sewed a straight stitch to reattach.
This does leave a seam of course, but is necessary in order for the skirt to be the same length all the way around. Now you will have one long, continuous piece of 16" high fabric.
Then I cut another sheet (also a thrift store find!) to the dimensions of the box spring + 1.5" for serging and 1" seam allowance. Mine measured 59.5" wide & 79" long.
After serging the sheet, I laid it in place on the box spring. (Of course before I did this I had to remove the mattress which probably wasn't a good idea considering that I am 7 months pregnant. It was heavier than I thought!)
Next I marked the middle of the front of the sheet and the middle of the front of the skirt with a pin.
I matched up the middles and pinned right sides together 1" up across the front, stopping about 6" before the corner. I placed the pins parallel to the edge of the sheet / skirt so that I was able to flip the skirt down and check the length.
Then I started at the top (headboard side), matched the edge of the sheet to the edge of the skirt, and continued pinning right sides together 1" up, once again stopping just sort of the corner.
At this point the skirt was pinned all around the sheet except for the corners.
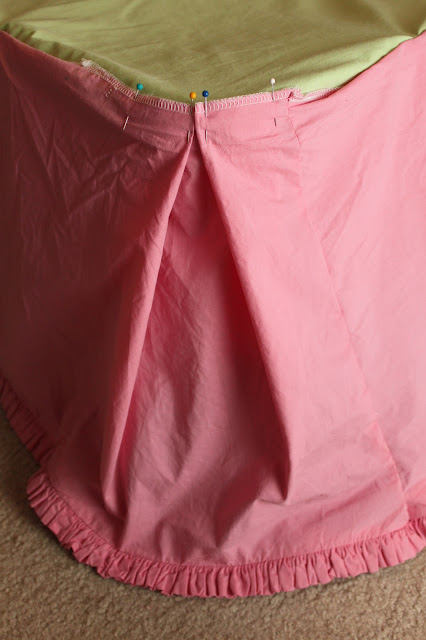
To make the inverted box pleats, you have to work from the right side of the fabric. An inverted box pleat is formed by two equal folds of fabric folded toward one another so they meet at the center of the pleat on the right side of the fabric. If you had an abundance of fabric, there are calculated ways to make a box pleat but in this case I simply folded the excess skirt fabric at each corner towards each other until they met, making sure that the pleat was the same depth on both sides. I pinned the pleat in place but did NOT pin to the sheet that I was using for the middle of the bed skirt.
I sewed the pleat with a basting stitch using a 1/2" seam, then put the skirt back on the bed and pinned a 1" hem for the corners as I'd done for the rest of the skirt.
After checking to make sure I was happy with the length on all sides, I hemmed all around the skirt using a 1" seam allowance so I would have some wiggle room just in case.
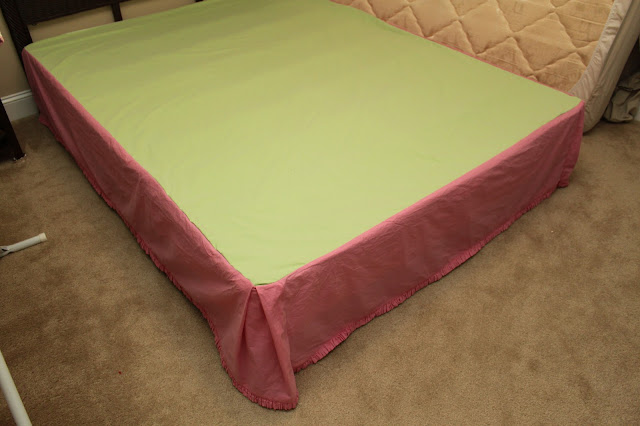
And here is the finished product! (Not ironed and at 1 am.) Better pictures will follow once we get Sophie's new room together.
Not bad for $2.99, huh? The only queen size pink bed skirt I could find was $50!
I have several other bedroom / nursery projects in the works, including curtains, throw pillows, crib sheet, and something to go over the crib. Stay tuned!
UPDATE: Here are some pictures of the bedskirt in Sophie's room. Go HERE to see her big girl room reveal!
Linking to these parties!


Thanks so much for coming to our Link-Up party. We had great ideas. I can't wait to see what you create for next Thursday's party at allthingswithpurpose.com!!
ReplyDeleteWhat a great pink colour! I love the ruffle on the bottom of the bed skirt. My daughter needs a bed skirt, as does my son for his 3/4 size bed, so I will likely have to make at least his, if not both.
ReplyDeleteThis is very pretty. If you had found the duvet in King size then maybe you wouldn't have to do all the seweing. Then again it would have been too big. :)
ReplyDeleteWell done! This is my first visit to your blog, I found you on Diana Rambles. What a cute blog!! I'm going to nose around for a while, if you don't mind. :) Have a great weekend!
ReplyDeleteDebbie
My girls will be getting a daybed with a trundle soon and I can't find a single daybed set that looks like a little girls. We will defiantly need a skirt to cover the trundle. Thank you so much for the inspiration.
ReplyDeleteWhat a beautiful job!!!
ReplyDeleteAnd a great tutorial - thanks for sharing!!!
Visiting from Nifty Thrifty Things
Big hugs,
Suzan
Really nice work and wow was this a great find!! Thanks for linking up to the Craftastic Monday party at Sew Can Do:)
ReplyDeleteThanks so much for the tutorial. It is very clear- great instructions. I will be making one soon for my bed from scratch but these directions will still apply. Your dust ruffle turned out great!
ReplyDeleteSuch a pretty blog.
Have a blessed and beautiful day.
Linda at The French Hens Nest
Very cute! I love the ruffles on the bottom, and finding exactly what you need at a thrift store is always nice too! :)
ReplyDeleteThis is adorable! And cheap too. It's hard to beat that combination :)
ReplyDeleteNice work! I love your work .. thanks for sharing!
ReplyDeleteI'm having a giveaway at my blog, so feel free to check it out: http://cloverandmustard.blogspot.com/2013/03/a-few-of-my-favorites-giveaway.html
Have a great week!
Thanks so much for linking up to Made With Love at Sew Chatty! I'm featuring you on the FB page today!
ReplyDeleteThis is so pretty! I will have to keep this is mind when we transition our daughter to a toddler bed.
ReplyDeleteBeautiful! I made almost all of my daughter's crib bedding because it wasn't easy to find the color sheets I needed! I love that you were creative and for only $3! Great job! :D
ReplyDeletewww.domesticblisssquared.com
Beautiful job. Such a great deal as well.
ReplyDeleteFabulous job! :)
ReplyDeleteNot bad at all for $2.99! Lol. It's so pretty!
ReplyDeleteI love this!! You did a great job!
ReplyDeleteI found your blog through the Craftionary link party, and I"m so glad I did! This bedskirt is beautiful! I love the color and ruffles. Your blog is beautiful; new follower here!
ReplyDeleteThanks for sharing!
Kim
This is adorable!! I found you at the Inspiration in Progress party. I'd like to invite you to join the Pinterest Power Party as well! Hope you have a terrific Thursday!
ReplyDeleteDanielle
http://www.sewmuchcrafting.com/2013/03/pinterest-power-party-co-host_13.html
Such pretty ruffles.. : )
ReplyDeleteSo happy to be here. Following you now!
I also host a party every Thursday. If you are interested in linking up you can find it live today on my blog.
I hope you are looking forward to a great weekend. : )
Hani
Oh, I love your bedskirt and your blog!! Thank you so much for sharing at A Bouquet of Talent this week. I am so thrilled to have you share with us. New follower, too! :) So sorry I am just now visiting! I usually am not this late, but it has been one of those weeks. LOL
ReplyDeleteI am featuring you at Pick of the Bunch later tonight. Have a wonderful weekend.
Hugs
Kathy
Thanks for the feature Kathy!
DeleteFabulous tutorial! I really love the look of this. Thanks so much for sharing, I'll be featuring this on my party highlights post. :)
ReplyDeleteYea! So excited to hear that...thanks!
DeleteGreat score! And I love how you re-purposed it...always great to know these tricks. Thank you for sharing. I headed over from The Scoop paryt and am glad I did.
ReplyDeleteThanks so much for sharing your tutorial at Daisy Cottage Designs. Your project has been featured at this week's Off the Hook!
ReplyDeleteThank you Lauren!
DeleteSuper pretty!!! Thanks for linking.
ReplyDeleteThat is super cute! My daughter would love one of these, thanks for the tutorial!
ReplyDeleteThanks so much for linking up to Much Ado About Monday! This bedskirt is so cute and I love how well you explain how to make it. Also wanted to let you know that this lovely creation will be featured tomorrow! I can't wait to see what you create next week! :)
ReplyDeleteJamie
www.huckleberrylove.com
Can't wait to see it on your feature post -- thanks!
DeleteI love this! It's so cute, and really well made. I'm super impressed. :-) Thanks so much for sharing at my link party!
ReplyDeleteOMG! I love this!!! I've always wanted to try this, but didn't know how! Thanks for the inspiration. PS - I just pinned this =) If you're interested, stop by site at www.thecityofmotherlylove.com to say "hi"
ReplyDeleteOh! Thank you for the tutorial! Thank you for sharing at the Give Me The Goods Party!
ReplyDeletewww.dimplesandpigtales.blogspot.com
So cute! Very clever. Found you at the Rock n Share.
ReplyDeleteWhat a wonderful labor of love and tutorial! Thanks for sharing it at the Rock N Share! Blessings, D
ReplyDeleteGreat bedskirt!! That's a lot of dedication! The whole room turned out beautiful!
ReplyDeleteWay cute!
ReplyDeleteThis is so pretty - what a great job!
ReplyDeleteI would love for you to link up at the Mommy Archive - we're focusing on bedrooms this week, Alice x