I made the curtains for the new -- yet to be named -- baby's nursery. My mother in law found the fabric at Joann's and it coordinates very well with the Pottery Barn Penelope bedding in the nursery. My inspiration was a tutorial from I Can Find the Time, but I modified several things.
- I used grosgrain ribbon instead of fabric sashes. Easier and prettier in my opinion!
- In the tutorial, the top border is the same color as the back liner of the curtain. I wanted a pink border but didn't want the whole back of the curtain to be pink (just in case you could see if from the outside) so I lined the back of the curtain with white but did a 4" pink border at the top for an accent color, which gets folded over to the front when you make the pocket for the rod.
- I added a gathered grosgrain ribbon to the edge of the top border using the new gathering foot I recently purchased.
- The tutorial attaches all four tie-up sashes to the front of the curtain, and then flips two
of the ties over the curtain rod to come down the
back side of the curtain to create the ties. I preferred not to have the back ties looped over the rod so I attached the ribbons that run down the back side of the curtain to the back in the seam between the white lining and the pink border, as shown below.
I love the way they turned out!
Especially the sweet ribbons!
By the way, do you know how hard it is to tie four ribbons to look EXACTLY the same? I don't want to tell you how long that "simple process" took!
The nursery is basically ready other than a few last minute decorative touches.
Linking to these parties!
Today I am debuting Sophie's birthday party dress, affectionately known as The Garden Party Dress in honor of her party theme. (Yes we are having a Garden Party!)
I used Pretty Prudent's One Shoulder Dress tutorial. They provide a free 2T pattern, which was the size I was trying to make, but I found that it was too big for my little sweet pea! Sophie is very petite for her age at only 23 lbs. so I had to trim about 2" off either side seam and take the elastic in at the top by several inches.
The top shoulder seam which measured 3" in the pattern had to be shorted to about 1 1/2". 3" stuck out beyond Sophie's shoulder and the ruffle wouldn't lay down flat. The trick with the ruffle is that the shoulder seam has to be shorter than the width of the ruffle in order for it lay down. Once these adjustments were made, it fit perfectly!
Also, I added rick rack trim at the bottom which I think really makes the dress POP! All you have to do is pin the rick rack at the very edge of your hem to the right side of the fabric.
Sew in place.
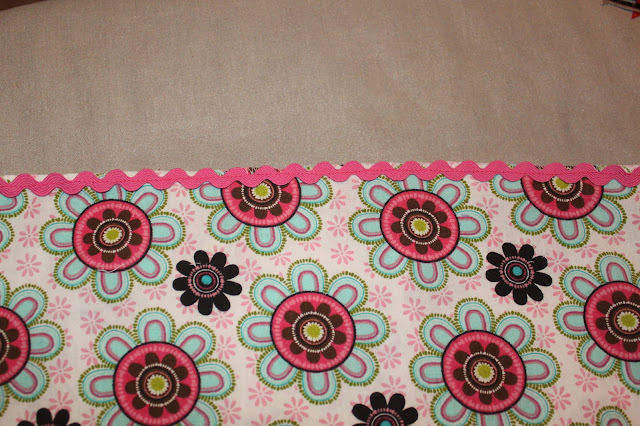
Then
flip the rick rack to the underside of the dress so that only half of
the rick rack is visible from the front.
Top stitch down using a 3mm
stitch.
This is how it looks when you're done:
You just need an extra 1/4" on your hem length to account for the tiny part of the fabric that gets folded under.
I really like the style of this dress. You don't see many one-shouldered dresses for toddlers so it's very unique. I found the fabric at Walmart in one of those little pre-cut stash starter packs.
Sophie will be wearing this at her 3rd birthday party on Saturday so check back soon for some pictures!
UPDATE 4/22/13: See Sophie wearing the dress and check out the party details on this post.
Linking to these parties!
Sophie will be inheriting the queen size bed from our guest room which we are converting into a nursery. Do you know how hard it is to find a PINK queen-size bedskirt? There are tons to choose from for twin and full size beds but I guess most little girls don't have a queen size. Luckily I found a solution.
When I saw the ruffles on this duvet cover peaking out at me from the linens section in the thrift store, I could not resist. When I got it home and realized that it was the exact same pink in Sophie's "big girl" bedding, it was too good to be true. So I decided to transform this duvet into a bedskirt.
I was hoping I could get away with simply cutting / stitching the corners and not having to construct the bedskirt from scratch but no such luck. It was about 1" too short on each side and 2" short in the front, and the corners hung down several inches below the sides and front. That wasn't going to work. So out came the scissors and the sewing machine.
The duvet was double sided as it had a pocket to insert a comforter, so I had to pull out the seam ripper and remove one side of the fabric. (And now I have lots of extra pink fabric for making who knows what!) I know it's unlikely that most people will be converting duvet covers into bedskirts, but the steps below could also be applied if you are using a regular sheet.
I wanted a 14" drop on the skirt, which is pretty standard for most beds. So I cut up 16" up from the bottom of the ruffle around both sides and the front to allow for serging and a large 1" to 1.5" seam allowance. I wanted to have extra that could be let out in the event that the drop was too short. Better safe than sorry!
This is what the duvet cover looked like at this point:
In order to eliminate the fact that the corners were too long, and also to be able to add inverted box pleats at both corners, I cut the duvet cover at both front corners, as shown below.
Then I removed the ruffle at the cut corners.
After serging both cut edges to prevent fraying, I pinned right sides together and sewed a straight stitch to reattach.
This does leave a seam of course, but is necessary in order for the skirt to be the same length all the way around.
Now you will have one long, continuous piece of 16" high fabric.
Then I cut another sheet (also a thrift store find!) to the dimensions of the box spring + 1.5" for serging and 1" seam allowance. Mine measured 59.5" wide & 79" long.
After serging the sheet, I laid it in place on the box spring. (Of course before I did this I had to remove the mattress which probably wasn't a good idea considering that I am 7 months pregnant. It was heavier than I thought!)
Next I marked the middle of the front of the sheet and the middle of the front of the skirt with a pin.
I matched up the middles and pinned right sides together 1" up across the front, stopping about 6" before the corner. I placed the pins parallel to the edge of the sheet / skirt so that I was able to flip the skirt down and check the length.
Then I started at the top (headboard side), matched the edge of the sheet to the edge of the skirt, and continued pinning right sides together 1" up, once again stopping just sort of the corner.
At this point the skirt was pinned all around the sheet except for the corners.
To make the inverted box pleats, you have to work from the right side of the fabric. An inverted box pleat is formed by two equal folds of fabric folded toward one another so they meet at the center of the pleat on the right side of the fabric. If you had an abundance of fabric, there are calculated ways to make a box pleat but in this case I simply folded the excess skirt fabric at each corner towards each other until they met, making sure that the pleat was the same depth on both sides. I pinned the pleat in place but did NOT pin to the sheet that I was using for the middle of the bed skirt.
I sewed the pleat with a basting stitch using a 1/2" seam, then put the skirt back on the bed and pinned a 1" hem for the corners as I'd done for the rest of the skirt.
After checking to make sure I was happy with the length on all sides, I hemmed all around the skirt using a 1" seam allowance so I would have some wiggle room just in case.
And here is the finished product! (Not ironed and at 1 am.) Better pictures will follow once we get Sophie's new room together.
Not bad for $2.99, huh? The only queen size pink bed skirt I could find was $50!
I have several other bedroom / nursery projects in the works, including curtains, throw pillows, crib sheet, and something to go over the crib. Stay tuned!
UPDATE: Here are some pictures of the bedskirt in Sophie's room. Go HERE to see her big girl room reveal!
Linking to these parties!


