Sunday, July 28, 2013

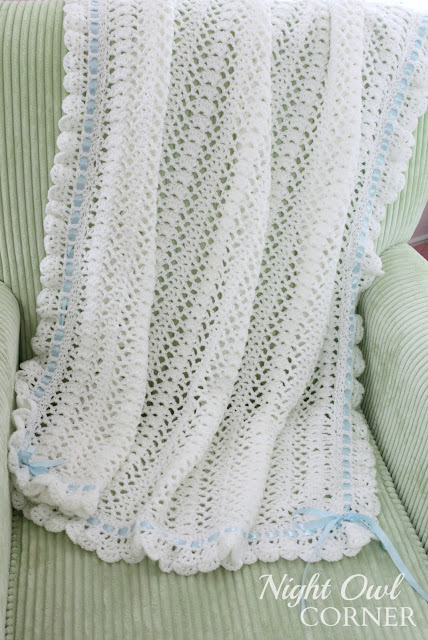
Ribbons and Ruffles Baby Blanket


How beautiful is this blanket??? It is the perfect keepsake and can be customized using ribbon of your choice. Which means you can start working on it long before you know if the baby
will be a boy or girl.


I made one for Sophie that I trimmed with pink ribbon and and another one years ago trimmed in blue ribbon for a close friend who was having a little boy. It's made up of shell stitches with scalloped edging.


We had both Sophie's and Audrey's newborn pictures taken with the blanket. 


And carried both of them out of the hospital in it!

It is a time consuming project though, so probably only one that you'd want to make for yourself, a family member or a close friend. I worked on it off and on the whole time I was pregnant with Sophie.


The pattern came from a book called So Sweet Baby Afghans by Leisure Arts Little Books. I've had it for years - the copyright is 1999 - so more than likely it is out of print but you might  be able to find a copy on eBay.

 If you have time to invest in a big crochet project this blanket makes a beautiful keepsake.


Linking to these parties!

Monday, July 22, 2013

The Audrey Hat


These beautiful hats were made with the Best Baby Cloche pattern. I made one for my little Audrey and it turned out so sweet I couldn't resist making two more for friends who are also expecting.


I think this is the prettiest baby girl hat pattern I've ever seen. I normally like to try out new patterns when I make gifts but I think this is going to be my go-to pattern from now on because nothing compares to it.  


Here's my beautiful Audrey modeling the hats. 


 I took this picture at just the right time...look at that beautiful smile!


Linking to these parties!

Thursday, July 18, 2013

Here in Our Corner: Family Photos

By the time Audrey was 10 days old she'd already had two photo sessions. We had newborn pictures taken at the hospital and a family photos taken 10 days later at a plantation near our home. I can't ever have enough pictures! Especially when babies are little they change so quickly and I don't want to forget a single moment! 

These are some of the beautiful shots captured at the hospital the day after her arrival. 


Check back next week if you want to see how to make the crocheted beautiful hat and blanket Audrey was photographed with. I'll post some more pictures and some information on the patterns. 

Months ago I scheduled a family photo session to be taken on location shortly after Audrey's birth. I wanted to document the first few moments as a family of four and knew that I would be difficult to get pictures with Sophie at the hospital. Here are some of the pictures that were captured that day. 


I won't tell you how much I spent on all this but it was worth every penny! These moments go by so quickly but we'll be able to look back on these precious pictures for years to come. 

Friday, July 12, 2013

Curly Sue Dress


There hasn't been much crafting going on around here with a newborn in the house so I thought I would share one of my favorite past projects with you. 

You gotta love making something pretty out of something ordinary. This beautiful dress was made from one of my husband's old undershirts using the Curly Sue Dress tutorial at Delila Creates. 

The bottom of each layer is trimmed in red thread using a lettuce hem. I LOVE the contrast between the red and white. This could look pretty in so many colors though. The possibilities are endless. 


Instead of stitching on the exposed edge, I turned the edge under just a tiny bit (like 1/8") and trimmed on the folded part which looked a lot cleaner in my opinion. The fold is so tiny that the thread completely hides it. 


I monogrammed Sophie's initials on the front piece using Curlz font.  


To top it off I made a Pinwheel Bow using a tutorial from Hair Hardware. 


I have collected several more of his shirts in my stash for future refashion projects! 


Linking to these parties!

Monday, July 8, 2013

Paper Plate Turtles


Here are two fun and easy paper plate crafts for your little ones. 

I saw the idea for this paper plate turtle craft at Meet the Dubiens.  Jill who hosts this site has so many creative art ideas. 


Here's what you'll need to make one:
  • Two Paper Plates
  • Green Paint
  • Paint brushes
  • Googly eyes
  • Green construction paper
  • Tape or glue
  • Scissors

Directions:

1. Let your child paint the plate and construction paper with green paint. Let dry.
2. Cut out turtle head and feet shapes and attach to one plate with tape or glue. 
4. Tape or glue the 2 plates together. 
5. Glue on googly eyes.

Here's another cute one we made. 


You will need:

1. One Paper Plate
2. Construction paper 
3. Scissors
4. Black Marker
4. Glue

Directions:

1. Let your child cut out small pieces of construction paper. Help them cut out head.
2. Let child glue pieces to the paper plate to make a colorful shell. 
3. Draw eyes with black marker and attach to shell with glue. 

This one probably would've looked better with legs and a tail but Sophie was on the move this day and was off the her next activity before we could add them!


Linking to these parties!